.NET使用YARP通過(guò)編碼方式配置域名轉(zhuǎn)發(fā)實(shí)現(xiàn)反向代理
前面介紹了 YARP 通過(guò)配置文件的方式配置代理轉(zhuǎn)發(fā)(傳送門(mén)),而眾所周知,微軟的一貫作風(fēng)就是能通過(guò)配置文件做的事情,通過(guò)編碼的方式也能實(shí)現(xiàn)!YARP 也不例外,廢話不多說(shuō),直接上代碼!
首先,參照官方文檔,我們先新建一個(gè) InMemoryConfigProvider 類(lèi),并且繼承 IProxyConfigProvider 接口,類(lèi)里面還包含了一個(gè) IProxyConfig 的類(lèi),別看漏了噢!
這里多嘴一下,下面的代碼出現(xiàn)了 volatile 關(guān)鍵字,介紹一下它:volatile 是 C# 中用于控制同步的關(guān)鍵字,其意義是針對(duì)程序中一些敏感數(shù)據(jù),不允許多線程同時(shí)訪問(wèn),保證數(shù)據(jù)在任何訪問(wèn)時(shí)刻,最多有一個(gè)線程訪問(wèn),以保證數(shù)據(jù)的完整性,volatile 是修飾變量的修飾符。
public class InMemoryConfigProvider : IProxyConfigProvider{ private volatile InMemoryConfig _config; public InMemoryConfigProvider(IReadOnlyList<RouteConfig> routes, IReadOnlyList<ClusterConfig> clusters) {_config = new InMemoryConfig(routes, clusters); } public IProxyConfig GetConfig() => _config; public void Update(IReadOnlyList<RouteConfig> routes, IReadOnlyList<ClusterConfig> clusters) {var oldConfig = _config;_config = new InMemoryConfig(routes, clusters);oldConfig.SignalChange(); } private class InMemoryConfig : IProxyConfig {private readonly CancellationTokenSource _cts = new();public InMemoryConfig(IReadOnlyList<RouteConfig> routes, IReadOnlyList<ClusterConfig> clusters){ Routes = routes; Clusters = clusters; ChangeToken = new CancellationChangeToken(_cts.Token);}public IReadOnlyList<RouteConfig> Routes { get; }public IReadOnlyList<ClusterConfig> Clusters { get; }public IChangeToken ChangeToken { get; }internal void SignalChange(){ _cts.Cancel();} }}然后添加一個(gè)擴(kuò)展 InMemoryConfigProviderExtensions
public static class InMemoryConfigProviderExtensions{ public static IReverseProxyBuilder LoadFromMemory(this IReverseProxyBuilder builder, IReadOnlyList<RouteConfig> routes, IReadOnlyList<ClusterConfig> clusters) {builder.Services.AddSingleton<IProxyConfigProvider>(new InMemoryConfigProvider(routes, clusters));return builder; }}接下來(lái)就是寫(xiě)配置了,我個(gè)人還是喜歡在配置文件中寫(xiě),但是有動(dòng)態(tài)配置需求的話,又不想登錄服務(wù)器編輯 appsetting 文件,通過(guò)編碼的方式確實(shí)更為方便,將配置寫(xiě)進(jìn)庫(kù)或者其它存儲(chǔ)方式里面,那將是隨心所欲啊!上代碼:
Program.cs
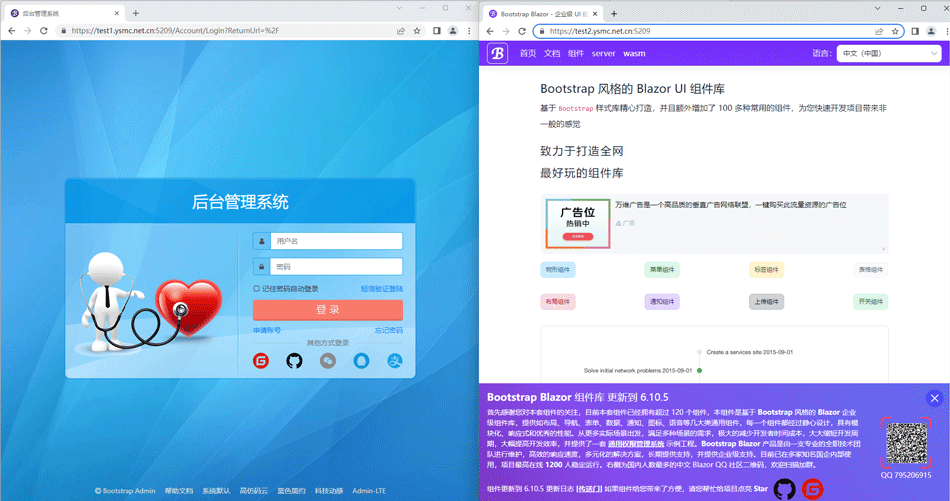
var routes = new[]{ new RouteConfig() {RouteId = "admin",ClusterId = "admin",Match = new RouteMatch{ Hosts = new string[] {"test1.ysmc.net.cn" }, Path = "{**catch-all}"} }, new RouteConfig() {RouteId = "blazor",ClusterId = "blazor",Match = new RouteMatch{ Hosts = new string[] {"test2.ysmc.net.cn" }, Path = "{**catch-all}"} }};var clusters = new[]{ new ClusterConfig() {ClusterId = "admin",LoadBalancingPolicy = "RoundRobin",Destinations = new Dictionary<string, DestinationConfig>(StringComparer.OrdinalIgnoreCase){ { "admin", new DestinationConfig() { Address = "https://admin.blazor.zone" } }} }, new ClusterConfig() {ClusterId = "blazor",LoadBalancingPolicy = "RoundRobin",Destinations = new Dictionary<string, DestinationConfig>(StringComparer.OrdinalIgnoreCase){ { "blazor", new DestinationConfig() { Address = "https://www.blazor.zone" } }} }};builder.Services.AddReverseProxy().LoadFromMemory(routes, clusters);上面的配置代碼,跟配置文件方式的節(jié)點(diǎn)和屬性,都是對(duì)應(yīng)的,照著寫(xiě)就是了
"ReverseProxy": { "Routes": { "admin": { "ClusterId": "admin", "Match": {"Hosts": [ "test1.ysmc.net.cn" ],"Path": "{**catch-all}" } }, "blazor": { "ClusterId": "blazor", "Match": {"Hosts": [ "test2.ysmc.net.cn" ],"Path": "{**catch-all}" } } }, "Clusters": { "admin": { "LoadBalancingPolicy": "RoundRobin", "Destinations": {"admin": { "Address": "https://admin.blazor.zone/"} } }, "blazor": { "LoadBalancingPolicy": "RoundRobin", "Destinations": {"blazor": { "Address": "https://www.blazor.zone/"} } } }}最終效果還是依舊的完美,感謝大佬的觀看,謝謝!
以上就是這篇文章的全部?jī)?nèi)容了,希望本文的內(nèi)容對(duì)大家的學(xué)習(xí)或者工作具有一定的參考學(xué)習(xí)價(jià)值,謝謝大家對(duì)的支持。如果你想了解更多相關(guān)內(nèi)容請(qǐng)查看下面相關(guān)鏈接
相關(guān)文章:
1. ASP.NET MVC實(shí)現(xiàn)區(qū)域或城市選擇2. 使用EF Code First搭建簡(jiǎn)易ASP.NET MVC網(wǎng)站并允許數(shù)據(jù)庫(kù)遷移3. .NET 6實(shí)現(xiàn)滑動(dòng)驗(yàn)證碼的示例詳解4. ASP.NET MVC使用Quartz.NET執(zhí)行定時(shí)任務(wù)5. ASP.NET MVC實(shí)現(xiàn)下拉框多選6. .Net Core使用Coravel實(shí)現(xiàn)任務(wù)調(diào)度的完整步驟7. ASP.NET MVC使用jQuery ui的progressbar實(shí)現(xiàn)進(jìn)度條8. ASP.Net MVC利用NPOI導(dǎo)入導(dǎo)出Excel的示例代碼9. ASP.NET MVC實(shí)現(xiàn)樹(shù)形導(dǎo)航菜單10. .NET Framework各版本(.NET2.0 3.0 3.5 4.0)區(qū)別

 網(wǎng)公網(wǎng)安備