Java的深拷貝與淺拷貝的幾種實現方式
關于Java的深拷貝和淺拷貝,簡單來說就是創建一個和已知對象一模一樣的對象。可能日常編碼過程中用的不多,但是這是一個面試經常會問的問題,而且了解深拷貝和淺拷貝的原理,對于Java中的所謂值傳遞或者引用傳遞將會有更深的理解。
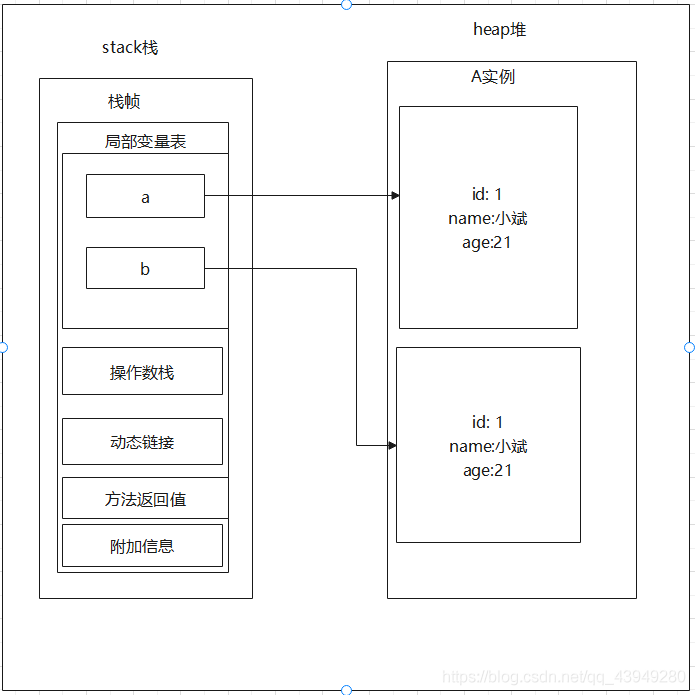
2、淺拷貝淺拷貝就是獲得拷貝對象的引用,而不是正真意義上的拷貝一個對象,例如
A a = new A(); A b = a;
此時引用變量a和b 同時指向了同一個堆中的內存空間,變量b只是復制了實例A的引用地址,并不是重新在堆中開辟了一個新的空間位置,來完整的復制實例A 如圖
深拷貝則是拷貝了源對象的所有值,所以即使源對象的值發生變化時,拷貝對象的值也不會改變。深拷貝則是真正意義上的拷貝,如圖
簡單來說就是一句話: 深拷貝和淺拷貝最根本的區別在于是否真正獲取一個對象的復制實體,而不是引用。
5、淺拷貝的實現首先,我們定義一下需要拷貝的簡單對象。
public class Student{ private String name; private int age; private String sex; }public class School { private String schoolName; private int stuNums; private Student stu;}
如上述代碼,我們定義了一個Student學生類,包含name姓名,和age年齡,sex性別,而是另一個School類,包含schoolName學校名稱和stuNums學生數量以及Student學生,其中Student并不是字符串,而是一個Student類。接下來我們將詳細描述如何簽拷貝School對象。我們看如下這段代碼:
public class Student{ private String name; private int age; private String sex; public String getName() { return name; } public void setName(String name) { this.name = name; } public int getAge() { return age; } public void setAge(int age) { this.age = age; } public String getSex() { return sex; } public void setSex(String sex) { this.sex = sex; } @Override public String toString() { return 'Student [name=' + name + ', age=' + age + ', sex=' + sex + ']'; }}
public class School implements Cloneable{ private String schoolName; private int stuNums; private Student stu; public String getSchoolName() { return schoolName; } public void setSchoolName(String schoolName) { this.schoolName = schoolName; } public int getStuNums() { return stuNums; } public void setStuNums(int stuNums) { this.stuNums = stuNums; } public Student getStu() { return stu; } public void setStu(Student stu) { this.stu = stu; } @Override protected School clone() throws CloneNotSupportedException { // TODO Auto-generated method stub return (School)super.clone(); } @Override public String toString() { return 'School [schoolName=' + schoolName + ', stuNums=' + stuNums + ', stu=' + stu + ']'; }}
這是一個我們要進行賦值的原始類 School。下面我們產生一個 School對象,并調用其 clone 方法復制一個新的對象。注意:調用對象的 clone 方法,必須要讓類實現 Cloneable 接口,并且覆寫 clone 方法。
public class TestClone { public static void main(String[] args) throws CloneNotSupportedException { //創建初始的School對象 School s1 = new School(); s1.setSchoolName('xx大學'); s1.setStuNums(2000); Student stu1 = new Student(); stu1.setAge(20); stu1.setName('肉丁'); stu1.setSex('女'); s1.setStu(stu1); School s2 = s1.clone(); //調用重寫的clone方法,clone出一個新的school---s2 System.out.println('s1: '+s1+' s1的hashcode:'+s1.hashCode()+' s1中stu1的hashcode:'+s1.getStu().hashCode()); System.out.println('s2: '+s2+' s2的hashcode:'+s2.hashCode()+' s2中stu1的hashcode:'+s2.getStu().hashCode());//System.out.println(s1.getStu().getAge()==s2.getStu().getAge()); System.out.println('----------------------------'); System.out.println('修改克隆出來的對象'); Student student2 = s2.getStu(); student2.setAge(21); student2.setName('斌'); s2.setStu(student2); System.out.println('s1: '+s1+' s1的hashcode:'+s1.hashCode()+' s1中stu1的hashcode:'+s1.getStu().hashCode()); System.out.println('s2: '+s2+' s2的hashcode:'+s2.hashCode()+' s2中stu1的hashcode:'+s2.getStu().hashCode());//System.out.println(s1.getStu().getAge()==s2.getStu().getAge()); }}
我們查看輸出的結果
s1: School [schoolName=xx大學, stuNums=2000, stu=Student [name=肉丁, age=20, sex=女]] s1的hashcode:500977346 s1中stu1的hashcode:20132171s2: School [schoolName=xx大學, stuNums=2000, stu=Student [name=肉丁, age=20, sex=女]] s2的hashcode:186370029 s2中stu1的hashcode:20132171修改克隆出來的對象s1: School [schoolName=xx大學, stuNums=2000, stu=Student [name=斌, age=21, sex=女]] s1的hashcode:500977346 s1中stu1的hashcode:20132171s2: School [schoolName=xx大學, stuNums=2000, stu=Student [name=斌, age=21, sex=女]] s2的hashcode:186370029 s2中stu1的hashcode:20132171
首先看原始類 School 實現 Cloneable 接口,并且覆寫 clone 方法,它還有三個屬性,一個引用類型 String定義的 schoolName,一個基本類型 int定義的 stuNums,還有一個引用類型 Student,這是一個自定義類,這個類也包含三個屬性 name、age和 sex。
接著看測試內容,首先我們創建一個School類的對象s1 ,其schoolName為xx大學,stuNums為2000,學生類Stundet三個屬性為 20、肉丁和女。接著我們調用 clone() 方法復制另一個對象 s2,接著打印這兩個對象的內容。
從第 2 行和第 5 行打印結果:
s1的hashcode:500977346 s2的hashcode:186370029
可以看出這是兩個不同的對象。
從第 1 行和第 4 行打印的對象內容看,原對象 s1 和克隆出來的對象 s2 內容完全相同。
代碼中我們只是更改了克隆對象 s2 的屬性Student 為斌、21、女(原對象 s1 是肉丁、20、女) ,但是從第 8 行和第 11 行打印結果來看,原對象 s1 和克隆對象 s2 的 Student屬性都被修改了。
也就是說對象 School的屬性 Student,經過 clone 之后,其實只是復制了其引用,他們指向的還是同一塊堆內存空間,當修改其中一個對象的屬性 Student,另一個也會跟著變化。
6、深拷貝的實現深拷貝的方式有很多種,文中我們將介紹三種方式
方法一 構造函數 方法二 重載clone()方法 方法三Serializable序列化6.1、構造函數public void constructorCopy() { Student student = new Student ('小李',21,'男'); School school = new School ('xx大學',100, student); // 調用構造函數時進行深拷貝 School copySchool = new School (school.getSchoolName(),school.getStuNums(), new Student(student.getName(), student.getAge(),student.getSex())); // 修改源對象的值 copySchool .getStudent().setSex('女'); // 檢查兩個對象的值不同 System.out.println(school.hashCode()==school2.hasCode()) }6.2、重載clone()方法
Object父類有個clone()的拷貝方法,不過它是protected類型的,我們需要重寫它并修改為public類型。除此之外,子類還需要實現Cloneable接口來告訴JVM這個類是可以拷貝的。讓我們還是看之前的School代碼
public class School implements Cloneable{ private String schoolName; private int stuNums; private Student stu; public String getSchoolName() { return schoolName; } public void setSchoolName(String schoolName) { this.schoolName = schoolName; } public int getStuNums() { return stuNums; } public void setStuNums(int stuNums) { this.stuNums = stuNums; } public Student getStu() { return stu; } public void setStu(Student stu) { this.stu = stu; } @Override protected School clone() throws CloneNotSupportedException { School school = (School) super.clone(); school.stu = (Student) stu.clone(); return school; } @Override public String toString() { return 'School [schoolName=' + schoolName + ', stuNums=' + stuNums + ', stu=' + stu + ']'; }}
public class Student implements Cloneable{ private String name; private int age; private String sex; public String getName() { return name; } public void setName(String name) { this.name = name; } public int getAge() { return age; } public void setAge(int age) { this.age = age; } public String getSex() { return sex; } public void setSex(String sex) { this.sex = sex; } @Override public String toString() { return 'Student [name=' + name + ', age=' + age + ', sex=' + sex + ']'; } @Override protected Student clone() throws CloneNotSupportedException { return (Student)super.clone(); }}
我們查看輸出的結果
s1: School [schoolName=xx大學, stuNums=2000, stu=Student [name=肉丁, age=20, sex=女]]s1的hashcode:500977346 s1中stu1的hashcode:20132171s2: School [schoolName=xx大學, stuNums=2000, stu=Student [name=肉丁, age=20, sex=女]] s2的hashcode:186370029 s2中stu1的hashcode:2094548358修改克隆出來的對象s1: School [schoolName=xx大學, stuNums=2000, stu=Student [name=肉丁, age=20, sex=女]] s1的hashcode:500977346 s1中stu1的hashcode:20132171s2: School [schoolName=xx大學, stuNums=2000, stu=Student [name=斌, age=21, sex=女]] s2的hashcode:186370029 s2中stu1的hashcode:2094548358
需要注意的是,super.clone()其實是淺拷貝,所以在重寫School類的clone()方法時,Student對象需要調用stu.clone()重新賦值。查看第 2 行和第 5 行
s1的hashcode:500977346 s2的hashcode:186370029
查看第 3 行和第 6 行
s1中stu1的hashcode:20132171s2中stu1的hashcode:2094548358
通過結果發現重新復制的對象s2和s1的hashCode不同,并且s1.stu與s2.stu2的hashCode也不同,由此證明復制的新的對象和原本的對象指向的不是同一個一個對象,意味著堆內存中存在兩個School實例
6.3、Serializable序列化我們看如下的代碼
import java.io.Serializable;public class User implements Serializable { private String name; private Address2 address; public User(String name, Address2 address) { this.name = name; this.address = address; } public String getName() { return name; } public void setName(String name) { this.name = name; } public Address2 getAddress() { return address; } public void setAddress(Address2 address) { this.address = address; } public Object deepClone() throws Exception { // 序列化 ByteArrayOutputStream bos = new ByteArrayOutputStream(); ObjectOutputStream oos = new ObjectOutputStream(bos); oos.writeObject(this); // 反序列化 ByteArrayInputStream bis = new ByteArrayInputStream(bos.toByteArray()); ObjectInputStream ois = new ObjectInputStream(bis); return ois.readObject(); }}
import java.io.Serializable;public class Address2 implements Serializable { private String city; private String country; public Address2(String city, String country) { this.city = city; this.country = country; } public String getCity() { return city; } public void setCity(String city) { this.city = city; } public String getCountry() { return country; } public void setCountry(String country) { this.country = country; } @Override public String toString() { return 'Address2{' +'city=’' + city + ’’’ +', country=’' + country + ’’’ +’}’; }}
注意 要使用序列化的方式來復制對象 對象需要繼承Serializable接口,接下來我們查看測試類
public static void main(String[] args) throws Exception { Address2 address = new Address2('大同', '中國'); User user = new User('yznl', address); User user2 = (User) user.deepClone(); System.out.println(user.toString()); System.out.println(user2.toString()); }
結果如下:
277630005,1915503092
通過比較user對象和克隆的user2對象的hashCode發現,也是不同的對象
到此這篇關于Java的深拷貝與淺拷貝的幾種實現方式的文章就介紹到這了,更多相關Java 深拷貝與淺拷貝內容請搜索好吧啦網以前的文章或繼續瀏覽下面的相關文章希望大家以后多多支持好吧啦網!
相關文章:

 網公網安備
網公網安備