在Idea中使用Docker部署SpringBoot項目的詳細步驟
前言
項目需要:
安裝Dockeridea中安裝docker插件,并配置docker一個SpringBoot項目創(chuàng)建Dockerfile
一、下載、安裝、配置Docker下載Docker
下載地址:官網(wǎng)下載 Docker
安裝
一直下一步就行
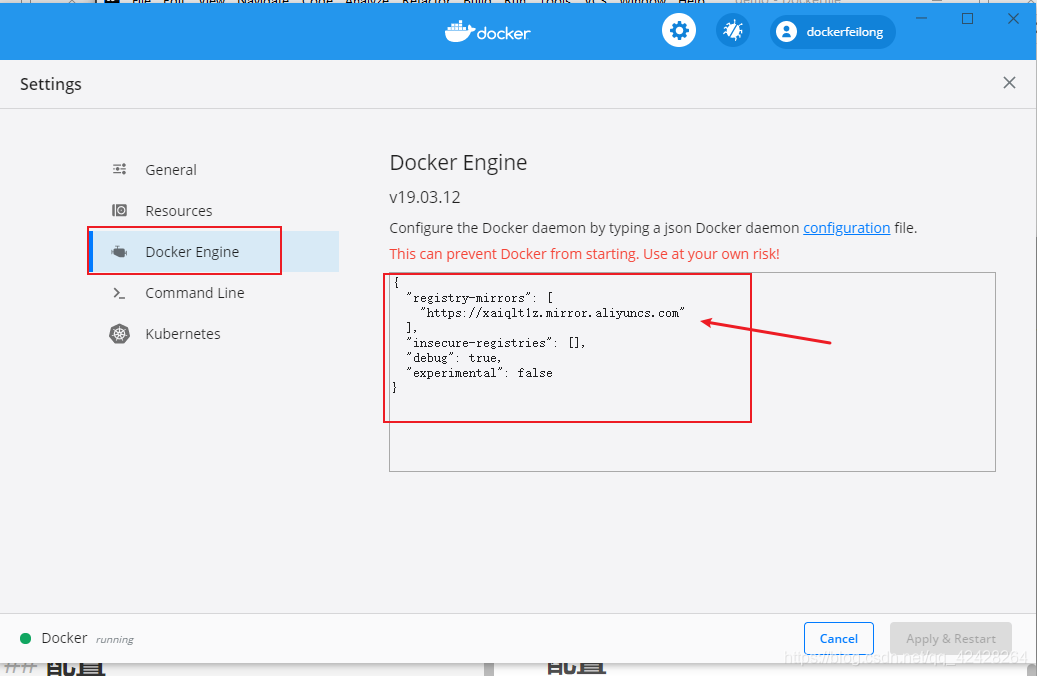
配置路徑:Settings?General 勾選 Expose daemon on tcp://localhost:2375 without TLS

設置鏡像,提高下載鏡像的速度https://xaiqlt1z.mirror.aliyuncs.com
測試是否安裝成功
C:Usersmsi>docker -vDocker version 19.03.12, build 48a66213feC:Usersmsi> docker run hello-worldHello from Docker!This message shows that your installation appears to be working correctly.To generate this message, Docker took the following steps: 1. The Docker client contacted the Docker daemon. 2. The Docker daemon pulled the 'hello-world' image from the Docker Hub. (amd64) 3. The Docker daemon created a new container from that image which runs the executable that produces the output you are currently reading. 4. The Docker daemon streamed that output to the Docker client, which sent it to your terminal.To try something more ambitious, you can run an Ubuntu container with: $ docker run -it ubuntu bashShare images, automate workflows, and more with a free Docker ID: https://hub.docker.com/For more examples and ideas, visit: https://docs.docker.com/get-started/
二、Idea 安裝Docker插件
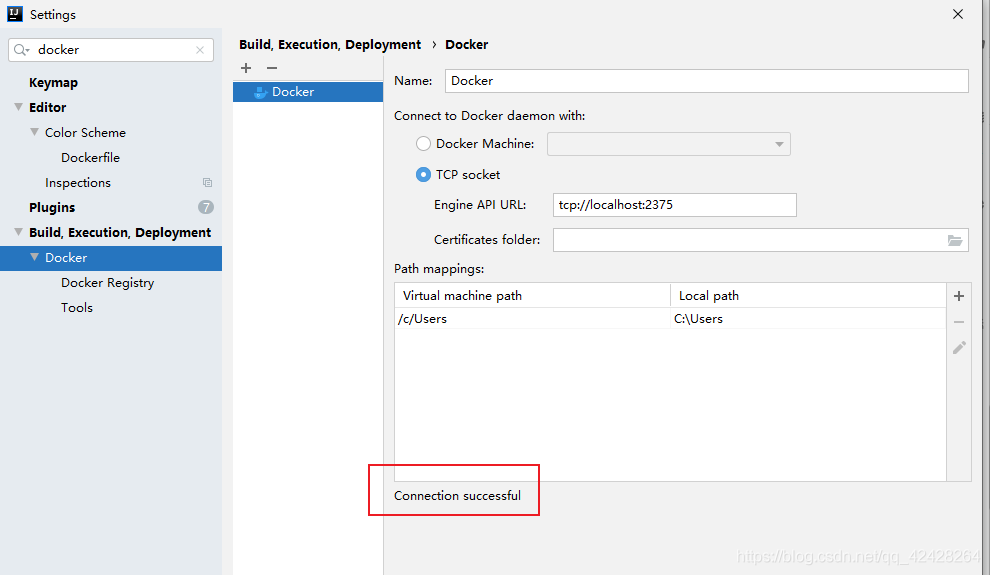
1.安裝docker插件在idea中: file--Plugins--Marketplace 搜索 Docker 安裝
2.配置Docker服務
file ? 搜索docker ? 選擇Docker ? 右側(cè)添加一個DockerConnection successful 顯示,表示 Docker鏈接成功
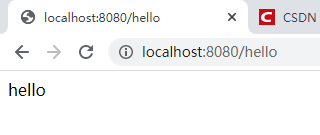
三、創(chuàng)建SpringBoot項目,修改pom.xmlspringMVC 項目,訪問 localhost:8080/hello 顯示 hello 字符串
@RequestMapping('/hello') @ResponseBody public String hello () { return 'hello'; }
1.配置pom.xml 文件
<build> <plugins> <plugin><groupId>org.springframework.boot</groupId><artifactId>spring-boot-maven-plugin</artifactId><executions> <execution> <goals> <goal>repackage</goal> </goals> </execution></executions> </plugin> <plugin><groupId>com.spotify</groupId><artifactId>docker-maven-plugin</artifactId><version> 1.2.1</version><executions> <execution> <id>build-image</id> <phase>package</phase> <goals> <goal>build</goal> </goals> </execution></executions><configuration> <imageName>${project.artifactId}</imageName> <imageTags> <imageTag>latest</imageTag> </imageTags> <dockerDirectory>${project.basedir}</dockerDirectory> <dockerHost>http://localhost:2375</dockerHost> <resources> <resource> <targetPath>/</targetPath> <directory>${project.build.directory}</directory> <include>${project.build.finalName}</include> </resource> </resources></configuration> </plugin> </plugins> </build>
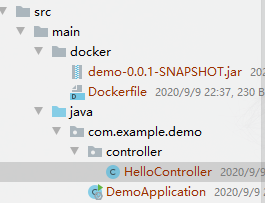
2.創(chuàng)建Docker 文件
在main文件夾下創(chuàng)建一個docker文件夾,并在里面創(chuàng)建一個Dockerfile文件。xxxxx.jar 是使用maven打包后復制進來的。
Dockerfile 文件內(nèi)容:
# From java image, version : 8FROM java:8# 掛載app目錄VOLUME /app# COPY or ADD to imageCOPY demo-0.0.1-SNAPSHOT.jar app.jarRUN bash -c 'touch /app.jar'EXPOSE 8080ENTRYPOINT ['java', '-jar', 'app.jar']
maven打包,將其target目錄下的jar包復制進docker目錄下。
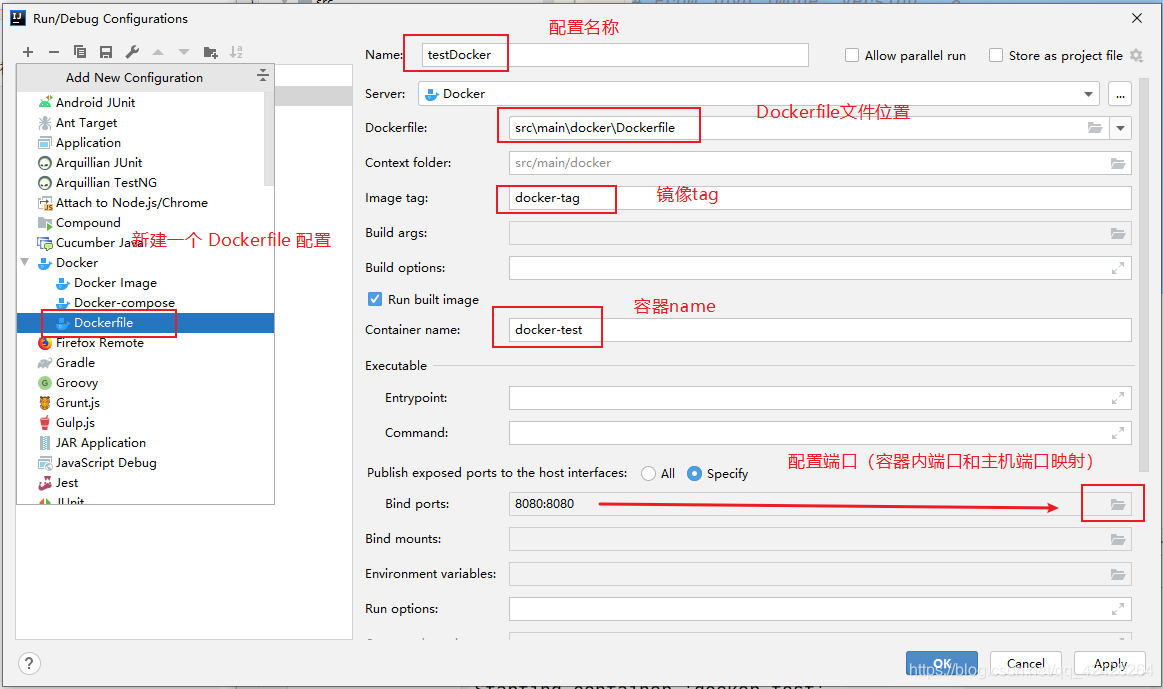
配置Dockerfile配置
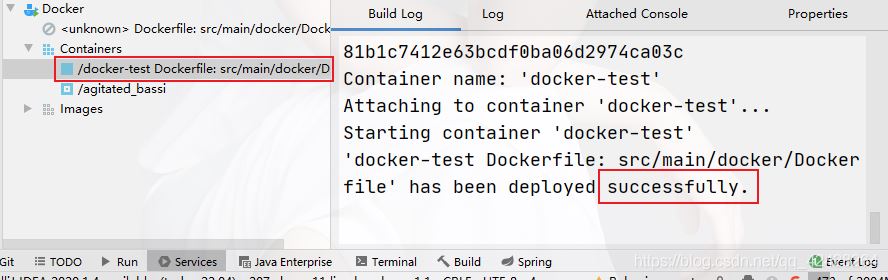
運行

運行成功
測試
使用docker 檢查容器是否啟動:

測試項目是否啟動:
總結(jié)
今天學了下Docker容器,基本的命令學會了,但是一直沒弄懂怎么使用。借此機會就花費時間進行學習。目前只是會用,后面會補上步驟詳細描述。
到此這篇關于在Idea中使用Docker部署SpringBoot項目的文章就介紹到這了,更多相關Docker部署SpringBoot項目內(nèi)容請搜索好吧啦網(wǎng)以前的文章或繼續(xù)瀏覽下面的相關文章希望大家以后多多支持好吧啦網(wǎng)!
相關文章:
1. 淺談XML Schema中的elementFormDefault屬性2. jsp學習之scriptlet的使用方法詳解3. ASP.NET MVC獲取多級類別組合下的產(chǎn)品4. ASP.NET MVC實現(xiàn)橫向展示購物車5. ThinkPHP5 通過ajax插入圖片并實時顯示(完整代碼)6. Docker 容器健康檢查機制7. python b站視頻下載的五種版本8. ASP.NET MVC使用Session會話保持表單狀態(tài)9. python實現(xiàn)PolynomialFeatures多項式的方法10. 解決python使用list()時總是報錯的問題
 網(wǎng)公網(wǎng)安備