Spring(二):Spring通過IOC來創建對象
①新建一個maven項目后導入webmvc的依賴:因為webmvc包含了很多其他依賴,為了省事,干脆導入一個總的,方便省事!版本嘛!個人比較喜歡用最新版。
<dependency> <groupId>org.springframework</groupId> <artifactId>spring-webmvc</artifactId> <version>5.3.5</version> </dependency>
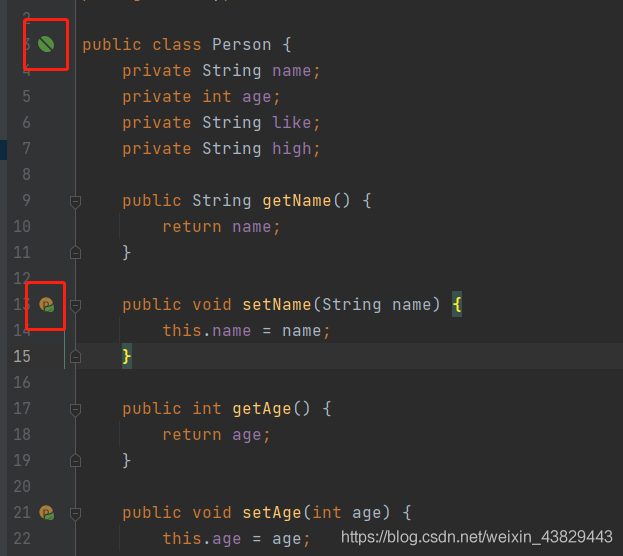
②新建實體測試類:
public class Person { private String name; private int age; private String like; private String high; //get、set、tostring方法為了篇幅省略,可以自己加或者使用lombok}
③在resources目錄下新建ContextAplication.xml文件
<?xml version='1.0' encoding='UTF-8'?><beans xmlns='http://www.springframework.org/schema/beans' xmlns:xsi='http://www.w3.org/2001/XMLSchema-instance' xsi:schemaLocation='http://www.springframework.org/schema/beans http://www.springframework.org/schema/beans/spring-beans.xsd'> <bean class='entity.Person'><property name='age' value='23'></property><property name='name' value='丁大大'></property><property name='like' value='釣魚'></property><property name='high' value='173'></property> </bean></beans>
④以上前提之后,你會發現你的測試Person類種發生了變化:點擊可以跳轉到指定的xml位置哦~
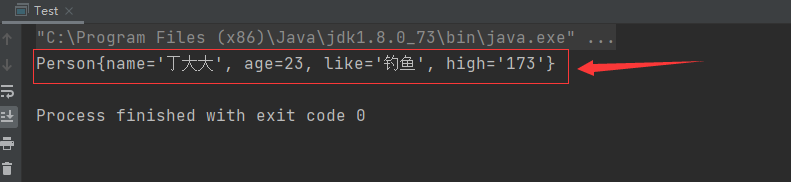
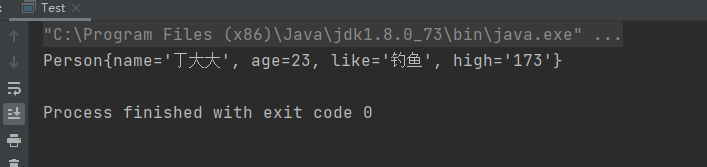
⑤測試:
Context.getBean() 不指定類時,需要強制轉換,所以建議使用第二種方式來獲取對象
public class Test { public static void main(String[] args) {ApplicationContext Context = new ClassPathXmlApplicationContext('ContextAplication.xml');//Person person = (Person) Context.getBean('Person');//這里不指定的話需要強轉,建議用下面的方式來拿對象Person person = Context.getBean('Person',Person.class);System.out.println(person); }}
⑥執行結果如下:成功拿到值!
⑦總結:
控制: 傳統的程序對象的創建是由程序來控制創建的。 反轉: 交給Spring容器來創建對象,而程序只負責被動的接收對象。這就是反轉。 依賴注入: 就是通過set方法來注入的。1.2 改造案例由xml選擇創建對象①xml:
<bean /> <bean /> <bean class='service.impl.PersonServiceImpl'><property name='studentMapper' ref='StudentMapperImpl'/> </bean>
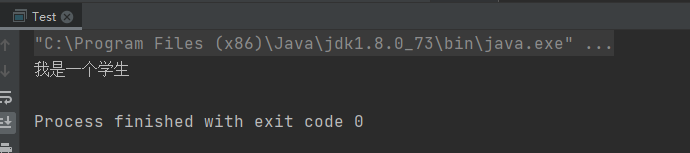
②測試:
ApplicationContext Context1 = new ClassPathXmlApplicationContext('ContextAplication.xml');PersonServiceImpl personServiceImpl = Context1.getBean('PersonServiceImpl', PersonServiceImpl.class);personServiceImpl.getPersonInfo();
③執行結果:
⑤總結:
對象由Spring 來創建 , 管理 , 裝配 !這就是 IOC!
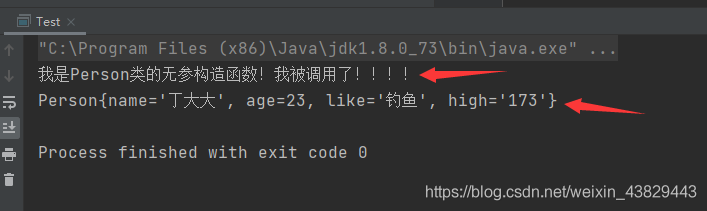
二、IOC是通過什么方式來創建對象的?2.1 通過無參構造函數來創建對象①以Person類為例子,但是加上一個無參構造函數!
public class Person { private String name; private int age; private String like; private String high; public Person() {//輸出一句話證明自己被調用了!System.out.println('我是Person類的無參構造函數!我被調用了!!!!'); } //set、get、tostring方法因為篇幅原因省略,請手動加上!}
②xml中配置:
<?xml version='1.0' encoding='UTF-8'?><beans xmlns='http://www.springframework.org/schema/beans' xmlns:xsi='http://www.w3.org/2001/XMLSchema-instance' xsi:schemaLocation='http://www.springframework.org/schema/beans http://www.springframework.org/schema/beans/spring-beans.xsd'> <bean class='entity.Person'><property name='age' value='23'></property><property name='name' value='丁大大'></property><property name='like' value='釣魚'></property><property name='high' value='173'></property> </bean></beans>
③測試類:
public class Test { public static void main(String[] args) {ApplicationContext Context = new ClassPathXmlApplicationContext('ContextAplication.xml');Person person = Context.getBean('Person', Person.class);System.out.println(person); }}
④執行結果:
⑤去除無參構造,增加有參構造:
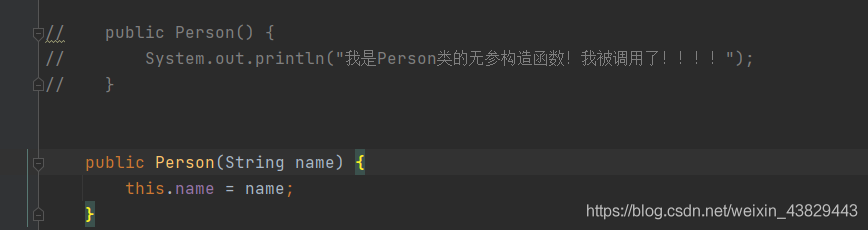
xml配置程序直接報錯:
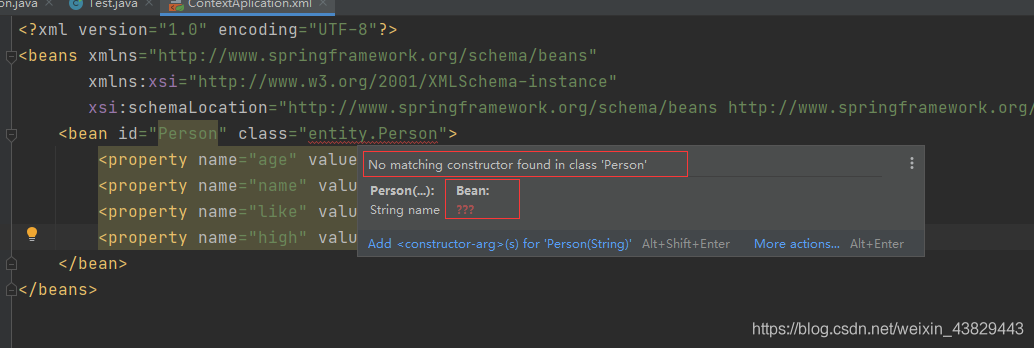
⑥總結:
Spring創建對象默認是通過無參構造函數創建的!能通過有參構造函數來創建對象嘛?能!看下面!
2.2 通過有參構造方法來創建對象①前提于 2.1 一致,新增有參構造函數:(因為類中,默認的也就是不寫構造參數就是無參構造,寫了有參構造才能真正意義上去除無參構造,這個不用解釋太多吧,java基礎的內容了~!)
public Person(String name, int age, String like, String high) {this.name = name;this.age = age;this.like = like;this.high = high; }
②xml配置文件中要發生一定的改變:
<?xml version='1.0' encoding='UTF-8'?><beans xmlns='http://www.springframework.org/schema/beans' xmlns:xsi='http://www.w3.org/2001/XMLSchema-instance' xsi:schemaLocation='http://www.springframework.org/schema/beans http://www.springframework.org/schema/beans/spring-beans.xsd'> <bean class='entity.Person'><!--<property name='name' value='丁大大'></property>--><!--<property name='age' value='23'></property>--><!--<property name='like' value='釣魚'></property>--><!--<property name='high' value='173'></property>--><constructor-arg index='0' value='丁大大'/><constructor-arg name='age' value='23'/><constructor-arg type='java.lang.String' value='釣魚'/><constructor-arg type='java.lang.String' value='173'/> </bean></beans>
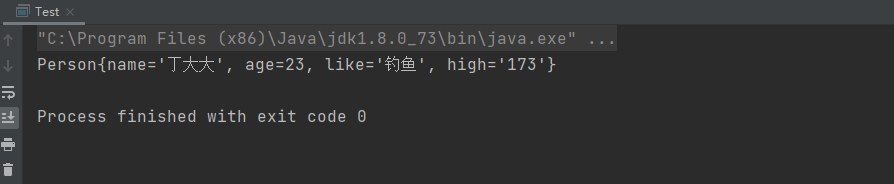
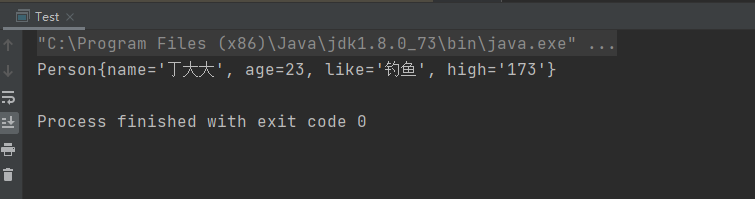
③執行結果:
⑤總結:
無參構造函數指定值時使用 propert 標簽 有參構造函數指定值時使用 constructor-arg 標簽,三種寫法 index --通過下標來給屬性賦值name --通過屬性名稱來給屬性賦值type -- 指定屬性的類型來給屬性賦值 基本類型可以直接寫 引用類型得加上全稱,如:java.lang.String 位置跟index差不多,依次從上到下對應屬性的從上到下。 在配置文件加載的時候。其中管理的對象都已經初始化了!三、Spring的配置3.1 alias(別名): 為bean設置別名,可設置多個!①xml:
<?xml version='1.0' encoding='UTF-8'?><beans xmlns='http://www.springframework.org/schema/beans' xmlns:xsi='http://www.w3.org/2001/XMLSchema-instance' xsi:schemaLocation='http://www.springframework.org/schema/beans http://www.springframework.org/schema/beans/spring-beans.xsd'> <alias name='Person' alias='personAlias1'/> <alias name='Person' alias='personAlias2'/> <alias name='Person' alias='personAlias3'/> <bean class='entity.Person'><constructor-arg index='0' value='丁大大'/><constructor-arg name='age' value='23'/><constructor-arg type='java.lang.String' value='釣魚'/><constructor-arg type='java.lang.String' value='173'/> </bean></beans>
②測試類:
public class Test { public static void main(String[] args) {ApplicationContext Context = new ClassPathXmlApplicationContext('ContextAplication.xml');Person person = Context.getBean('personAlias1', Person.class);System.out.println(person); }}
③執行結果:
④總結:講實話,這玩意用處不大,因為還有更好的方式來設置別名!
3.2 Bean的配置: bean就相當于java對象,由Spring創建和管理①xml:
<?xml version='1.0' encoding='UTF-8'?><beans xmlns='http://www.springframework.org/schema/beans' xmlns:xsi='http://www.w3.org/2001/XMLSchema-instance' xsi:schemaLocation='http://www.springframework.org/schema/beans http://www.springframework.org/schema/beans/spring-beans.xsd'> <alias name='Person' alias='personAlias1'/> <alias name='Person' alias='personAlias2'/> <alias name='Person' alias='personAlias3'/> <bean name='person1,person2 person3;person4' class='entity.Person'><constructor-arg index='0' value='丁大大'/><constructor-arg name='age' value='23'/><constructor-arg type='java.lang.String' value='釣魚'/><constructor-arg type='java.lang.String' value='173'/> </bean></beans>
②測試類:
public class Test { public static void main(String[] args) {ApplicationContext Context = new ClassPathXmlApplicationContext('ContextAplication.xml');Person person = Context.getBean('person4', Person.class);System.out.println(person); }}
③執行結果:
④總結:
id是bean的唯一標識符 如果沒有配置id,那么name相當于標識符,并且可以設置多個 name也是別名,可多個,并且可以通過 逗號 空格 分號 來分隔,是不是比alias別名方便?所以設置別名我們一般使用name id和name同時存在,name只是別名,不是標識符 class是類的全限定名 包名+類名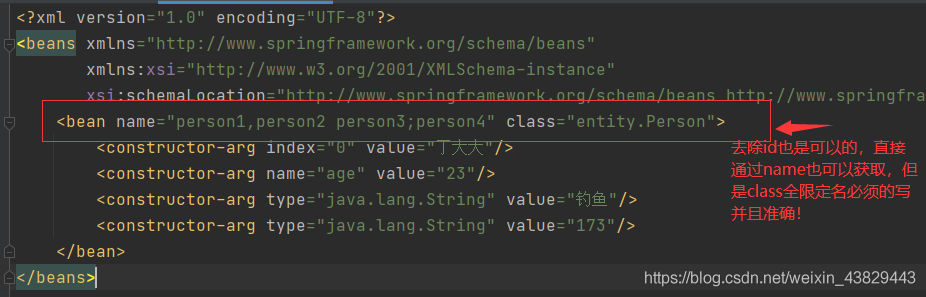
①在實際工作的開發過程中,一個項目可能由多個程序員來進行開發,所以為了解決共性問題,比如:同一文件提交時都進行了修改可能引起沖突,所以我們使用import來解耦!
②新建多個xml配置文件:
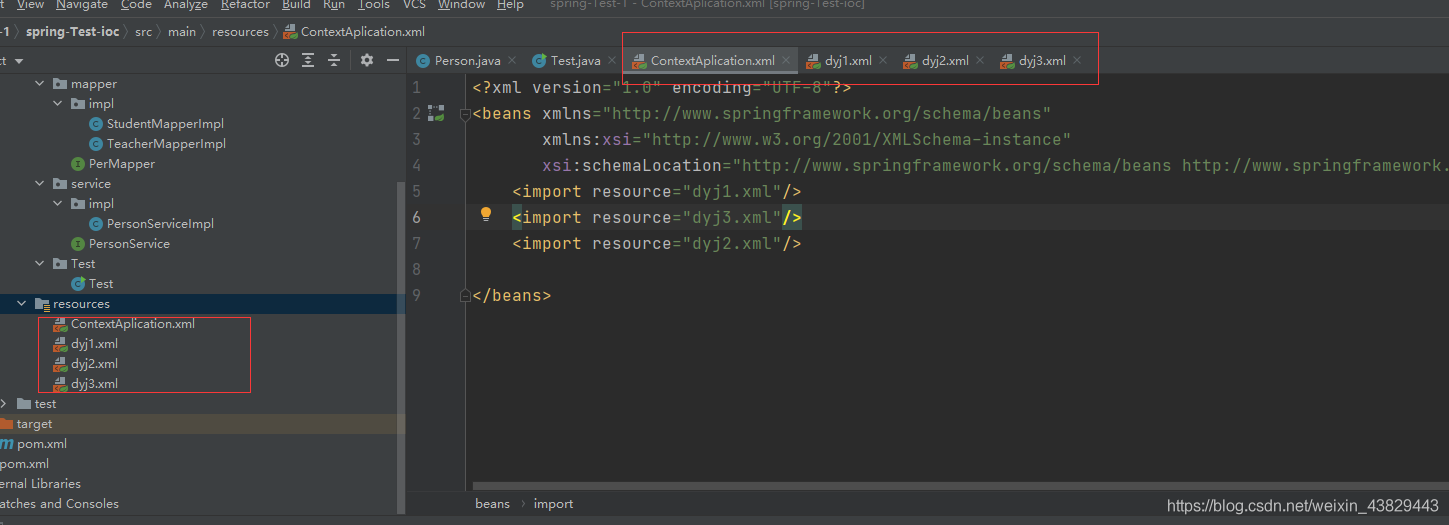
ContextAplication.xml:
<?xml version='1.0' encoding='UTF-8'?><beans xmlns='http://www.springframework.org/schema/beans' xmlns:xsi='http://www.w3.org/2001/XMLSchema-instance' xsi:schemaLocation='http://www.springframework.org/schema/beans http://www.springframework.org/schema/beans/spring-beans.xsd'> <import resource='dyj1.xml'/> <import resource='dyj3.xml'/> <import resource='dyj2.xml'/></beans>
dyj1.xml:
<?xml version='1.0' encoding='UTF-8'?><beans xmlns='http://www.springframework.org/schema/beans' xmlns:xsi='http://www.w3.org/2001/XMLSchema-instance' xsi:schemaLocation='http://www.springframework.org/schema/beans http://www.springframework.org/schema/beans/spring-beans.xsd'> <bean name='person1,person2 person3;person4' class='entity.Person'><constructor-arg index='0' value='丁大大1'/><constructor-arg name='age' value='23'/><constructor-arg type='java.lang.String' value='釣魚1'/><constructor-arg type='java.lang.String' value='173'/> </bean></beans>
dyj2.xml:
<?xml version='1.0' encoding='UTF-8'?><beans xmlns='http://www.springframework.org/schema/beans' xmlns:xsi='http://www.w3.org/2001/XMLSchema-instance' xsi:schemaLocation='http://www.springframework.org/schema/beans http://www.springframework.org/schema/beans/spring-beans.xsd'> <bean name='person1,person2 person3;person4' class='entity.Person'><constructor-arg index='0' value='丁大大2'/><constructor-arg name='age' value='23'/><constructor-arg type='java.lang.String' value='釣魚2'/><constructor-arg type='java.lang.String' value='173'/> </bean></beans>
dyj3.xml:
<?xml version='1.0' encoding='UTF-8'?><beans xmlns='http://www.springframework.org/schema/beans' xmlns:xsi='http://www.w3.org/2001/XMLSchema-instance' xsi:schemaLocation='http://www.springframework.org/schema/beans http://www.springframework.org/schema/beans/spring-beans.xsd'> <bean name='person1,person2 person3;person4' class='entity.Person'><constructor-arg index='0' value='丁大大3'/><constructor-arg name='age' value='23'/><constructor-arg type='java.lang.String' value='釣魚3'/><constructor-arg type='java.lang.String' value='173'/> </bean></beans>
③執行:
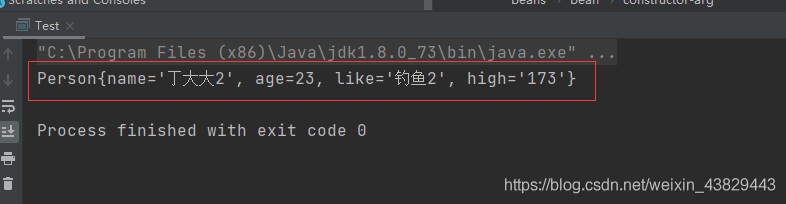
④總結:
如果三個文件都是對同一個操作同一個類,或者說內容一致,那么就以主xml中從上到下最后一個impot為準。 語法格式: 優點: 每個人開發的都是獨立的,如果重復的內容,Spring會幫我們自動合并!降低了程序的沖突性!大大提高了后期代碼的可維護性!總結本篇文章就到這里了,希望能幫助到你,也希望您能夠多多關注好吧啦網的更多內容!
相關文章:

 網公網安備
網公網安備