IDEA創(chuàng)建springboot + mybatis項目全過程(步驟詳解)
鑒于隔很久再在IDEA新建springboot項目時,會出現(xiàn)對步驟不確定的情況,因此,寫下這篇博客記錄創(chuàng)建一個可運行的springboot+mybatis項目的全過程。
步驟如下:
1.打開IDEA
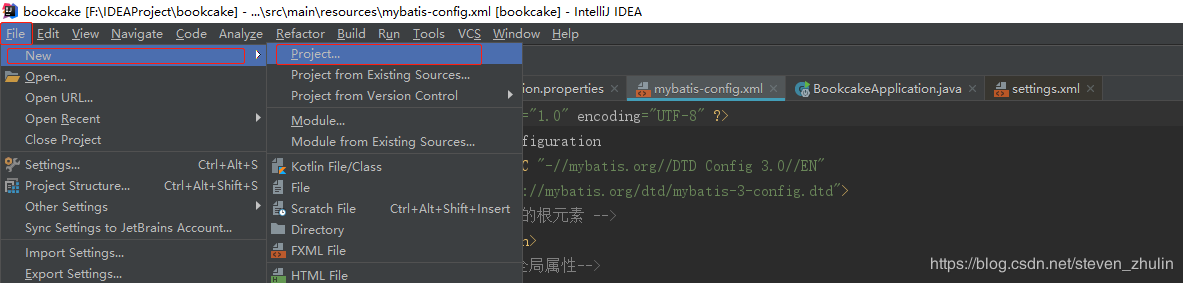
2.File ==> new ==> project ,如圖:
3.選擇spring Initializr ==> 右邊的Project SDK我選的是我已經(jīng)安裝的1.8版本,其他默認 ==> 點擊next

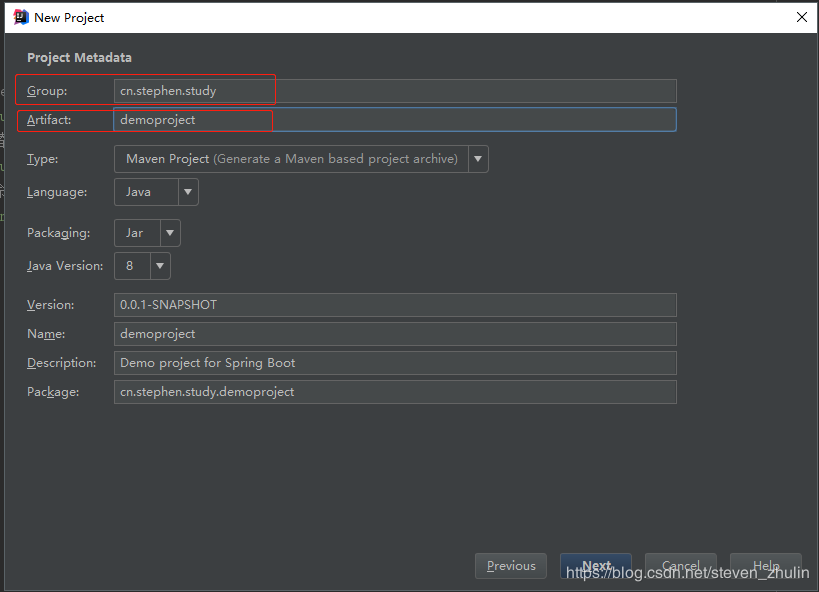
4.填寫Group (自己隨意就行,我的是cn + 個人英文名 + study) ==> 填寫 Artifact (也是自己隨意就行,這個也是你的項目名) ==> 點擊next ,如圖:
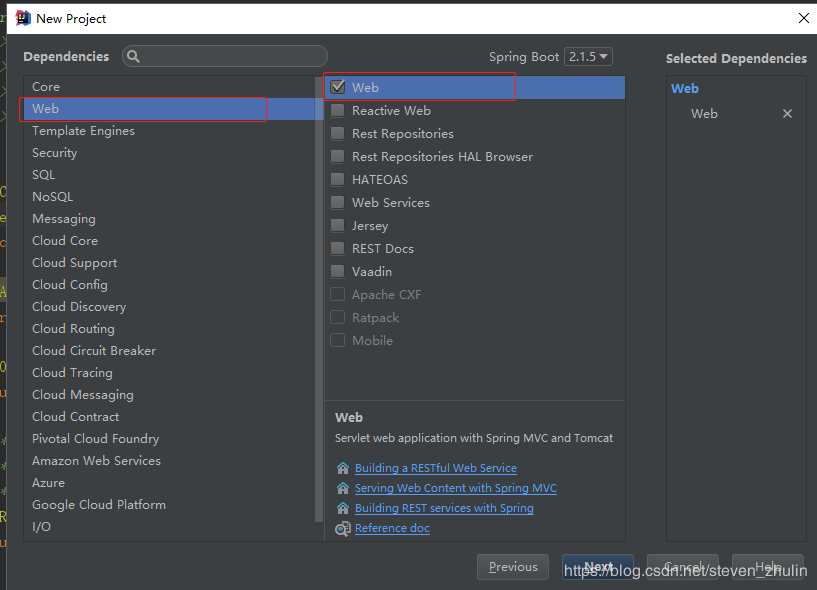
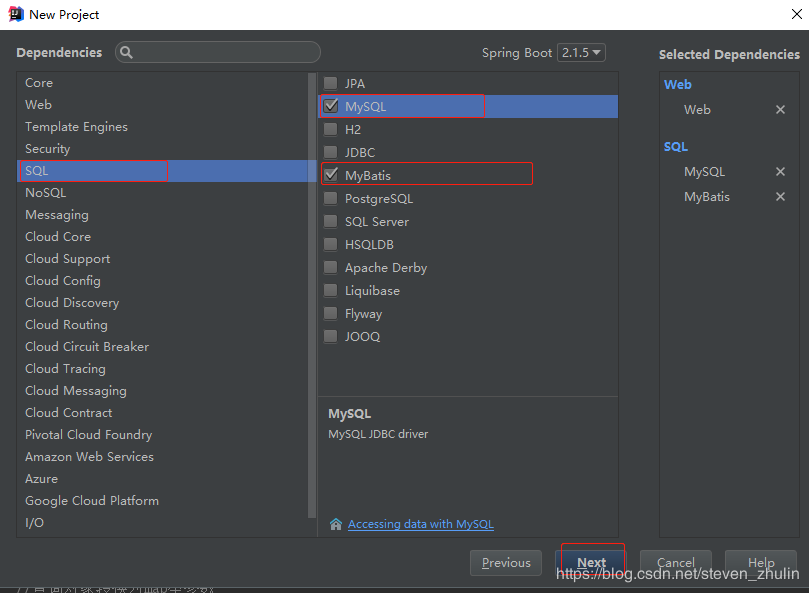
5.選擇項目所需依賴(由于項目是springboot+mybatis的Java后臺項目,因此需要勾上三個依賴) ==> 點擊next ,如圖:
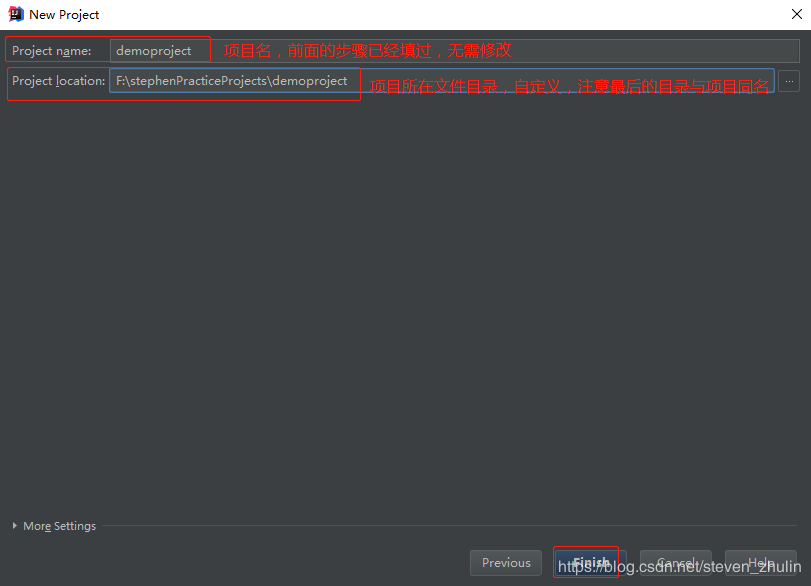
6.選擇項目路徑 ==> 點擊finish ,如圖:
6.最終生成的項目代碼目錄如圖(resources目錄下的static和templates目錄無用,可以刪掉):
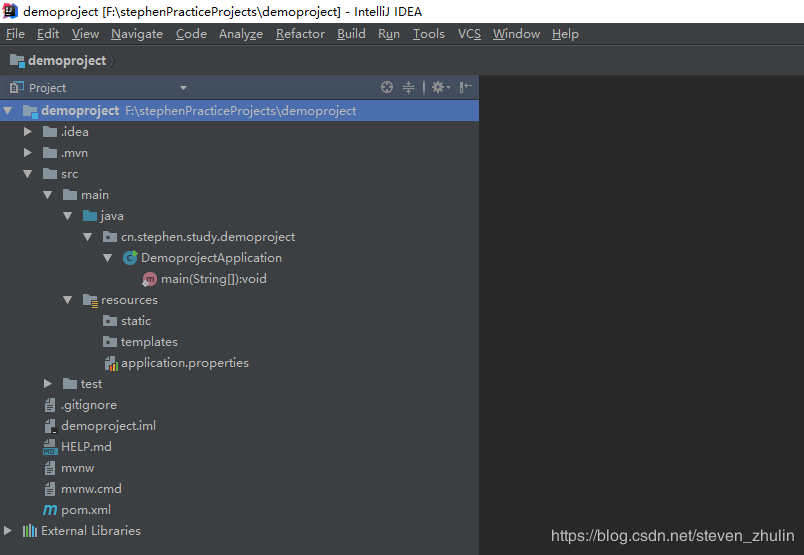
(注:如果DemoprojectApplication類(即啟動類)的圖標顯示是 J 而不是 C ,則說名該項目還沒有被初始化為maven項目,
只需要在項目的pom.xml文件上右鍵,再選擇 Add as maven 即可)
至此,springboot項目搭建完成一半,還需要做mybatis的配置,如下:
7.數(shù)據(jù)庫和mybatis的配置
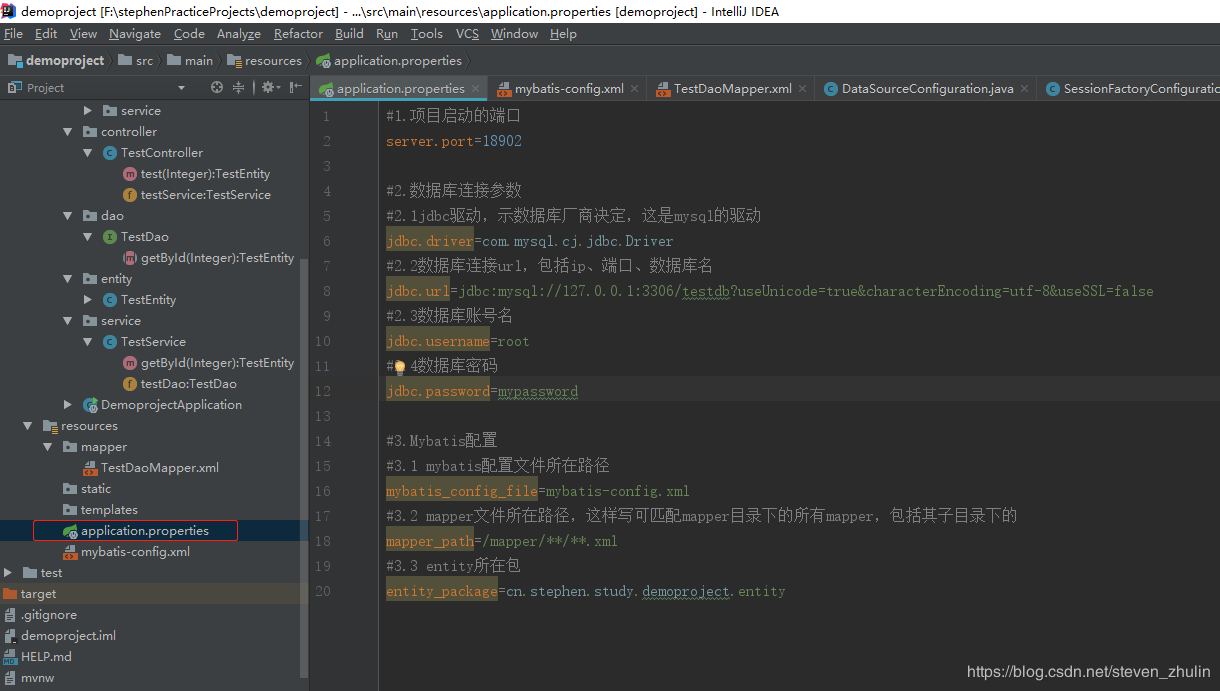
7.1 在application.properties填入數(shù)據(jù)庫連接參數(shù)和mybatis配置信息,application.properties內(nèi)容如下:
#1.項目啟動的端口server.port=18902 #2.數(shù)據(jù)庫連接參數(shù)#2.1jdbc驅(qū)動,示數(shù)據(jù)庫廠商決定,這是mysql的驅(qū)動jdbc.driver=com.mysql.cj.jdbc.Driver#2.2數(shù)據(jù)庫連接url,包括ip(127.0.0.1)、端口(3306)、數(shù)據(jù)庫名(testdb)jdbc.url=jdbc:mysql://127.0.0.1:3306/testdb?useUnicode=true&characterEncoding=utf-8&useSSL=false#2.3數(shù)據(jù)庫賬號名jdbc.username=root#2.4數(shù)據(jù)庫密碼jdbc.password=mypassword #3.Mybatis配置#3.1 mybatis配置文件所在路徑mybatis_config_file=mybatis-config.xml#3.2 mapper文件所在路徑,這樣寫可匹配mapper目錄下的所有mapper,包括其子目錄下的mapper_path=/mapper/**/**.xml#3.3 entity所在包entity_package=cn.stephen.study.demoproject.entity
示例如圖:
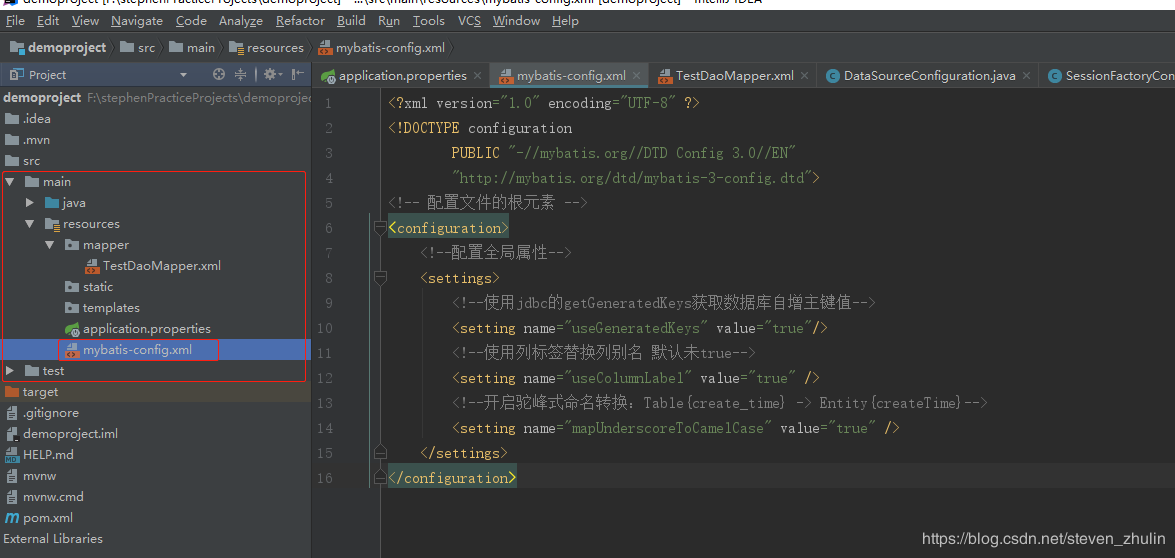
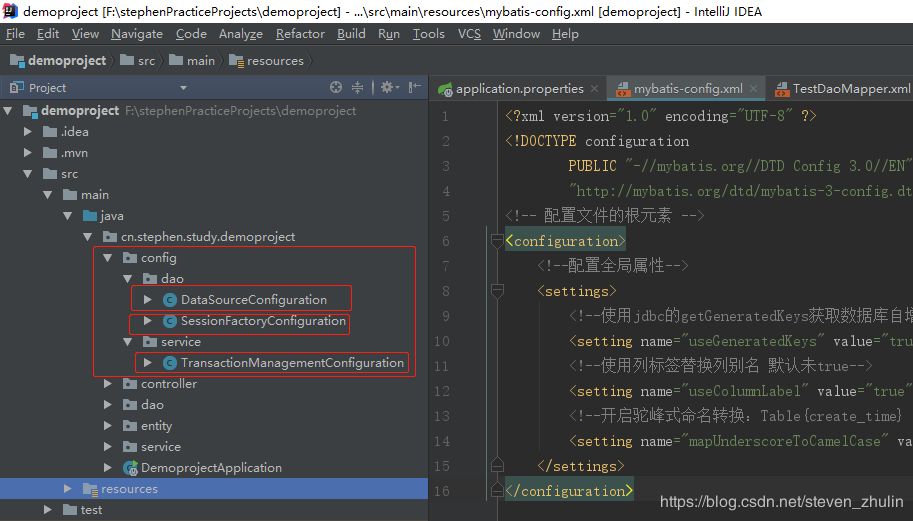
7.2 在resources目錄下新建 mybatis-config.xml文件,文件內(nèi)容如下:
<?xml version='1.0' encoding='UTF-8' ?><!DOCTYPE configuration PUBLIC '-//mybatis.org//DTD Config 3.0//EN' 'http://mybatis.org/dtd/mybatis-3-config.dtd'><!-- 配置文件的根元素 --><configuration> <!--配置全局屬性--> <settings> <!--使用jdbc的getGeneratedKeys獲取數(shù)據(jù)庫自增主鍵值--> <setting name='useGeneratedKeys' value='true'/> <!--使用列標簽替換列別名 默認未true--> <setting name='useColumnLabel' value='true' /> <!--開啟駝峰式命名轉(zhuǎn)換:Table{create_time} -> Entity{createTime}--> <setting name='mapUnderscoreToCamelCase' value='true' /> </settings></configuration>
效果如圖:
7.3 新建 config包,在其中新建配置類。共三個配置類,如圖:
DataSourceConfiguration類的代碼如下:
package cn.stephen.study.demoproject.config.dao; import com.mchange.v2.c3p0.ComboPooledDataSource;import org.springframework.beans.factory.annotation.Value;import org.springframework.context.annotation.Bean;import org.springframework.context.annotation.Configuration; import java.beans.PropertyVetoException; /** * 數(shù)據(jù)庫配置類 */@Configurationpublic class DataSourceConfiguration { @Value('${jdbc.driver}') private String jdbcDriver; @Value('${jdbc.url}') private String jdbcUrl; @Value('${jdbc.username}') private String jdbcUsername; @Value('${jdbc.password}') private String jdbcPassword; @Bean(name = 'dataSouce') public ComboPooledDataSource createDataSouce() throws PropertyVetoException { ComboPooledDataSource dataSource = new ComboPooledDataSource(); dataSource.setDriverClass(jdbcDriver); dataSource.setJdbcUrl(jdbcUrl); dataSource.setUser(jdbcUsername); dataSource.setPassword(jdbcPassword); //關(guān)閉連接后不自動commit dataSource.setAutoCommitOnClose(false); return dataSource; }}
SessionFactoryConfiguration類的代碼如下:
package cn.stephen.study.demoproject.config.dao; import org.mybatis.spring.SqlSessionFactoryBean;import org.springframework.beans.factory.annotation.Autowired;import org.springframework.beans.factory.annotation.Value;import org.springframework.context.annotation.Bean;import org.springframework.context.annotation.Configuration;import org.springframework.core.io.ClassPathResource;import org.springframework.core.io.support.PathMatchingResourcePatternResolver; import javax.sql.DataSource;import java.io.IOException; /** * 數(shù)據(jù)庫sqlSession配置類 */ @Configurationpublic class SessionFactoryConfiguration { @Value('${mapper_path}') private String mapperPath; @Value('${mybatis_config_file}') private String mybatisConfigFilePath; @Autowired private DataSource dataSouce; @Value('${entity_package}') private String entityPackage; @Bean(name='sqlSessionFactory') public SqlSessionFactoryBean createSqlSessionFactoryBean() throws IOException { SqlSessionFactoryBean sqlSessionFactoryBean = new SqlSessionFactoryBean(); sqlSessionFactoryBean.setConfigLocation(new ClassPathResource(mybatisConfigFilePath)); PathMatchingResourcePatternResolver resolver = new PathMatchingResourcePatternResolver(); String packageSearchPath = PathMatchingResourcePatternResolver.CLASSPATH_ALL_URL_PREFIX+mapperPath; sqlSessionFactoryBean.setMapperLocations(resolver.getResources(packageSearchPath)); sqlSessionFactoryBean.setDataSource(dataSouce); sqlSessionFactoryBean.setTypeAliasesPackage(entityPackage); return sqlSessionFactoryBean; }}
TransactionManagementConfiguration類的代碼如下:
package cn.stephen.study.demoproject.config.service; import org.springframework.beans.factory.annotation.Autowired;import org.springframework.context.annotation.Configuration;import org.springframework.jdbc.datasource.DataSourceTransactionManager;import org.springframework.transaction.PlatformTransactionManager;import org.springframework.transaction.annotation.EnableTransactionManagement;import org.springframework.transaction.annotation.TransactionManagementConfigurer; import javax.sql.DataSource; /** * 事務(wù)配置類,不可缺少,尚未知具體作用 */@Configuration@EnableTransactionManagementpublic class TransactionManagementConfiguration implements TransactionManagementConfigurer{ @Autowired private DataSource dataSource; @Override public PlatformTransactionManager annotationDrivenTransactionManager() { return new DataSourceTransactionManager(dataSource); }}
三個類的代碼寫完后,在DataSourceConfiguration類中會報找不到某些類的錯,在下一步解決。
7.4 在 pom.xml文件的<dependencies></dependencies>插入以下兩個依賴
<!--線程池--><dependency> <groupId>com.mchange</groupId> <artifactId>c3p0</artifactId> <version>0.9.5.2</version></dependency><dependency> <groupId>org.projectlombok</groupId> <artifactId>lombok</artifactId> <optional>true</optional></dependency>
至此,項目配置已完成。。。。
8. 接下來,就按最普遍的分層代碼目錄結(jié)構(gòu)來寫一個基本的測試來測試項目是否能正常運行。代碼目錄結(jié)果如圖:
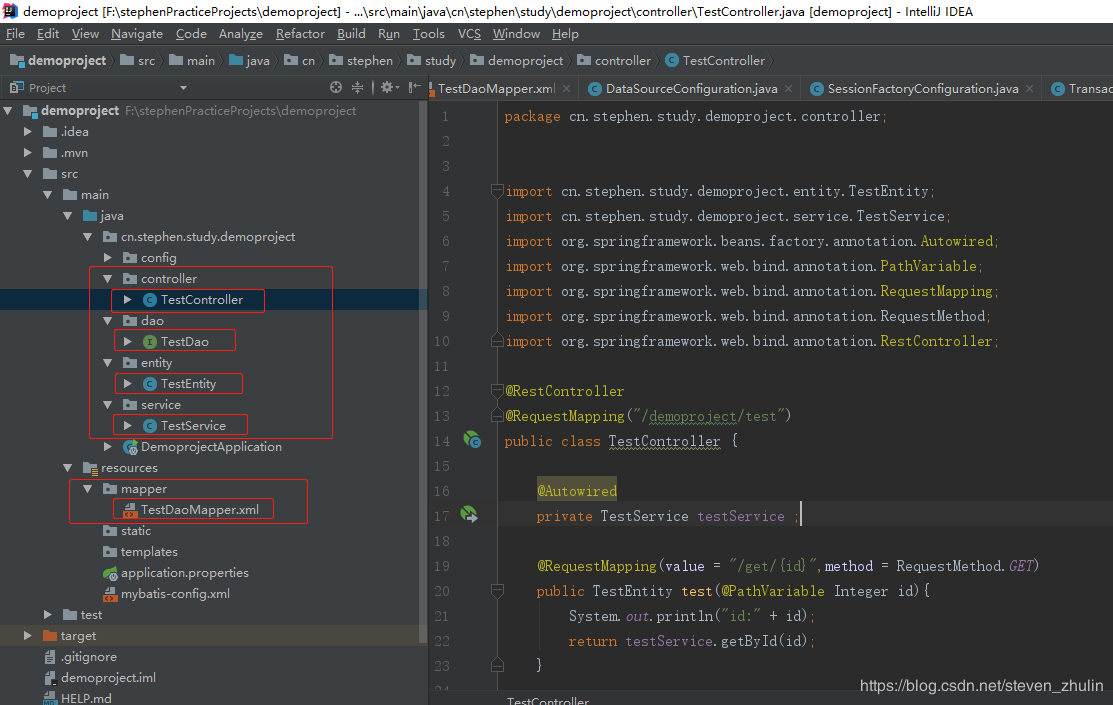
一共需要新建4個包(controller、service、dao、entity)和一個目錄(mapper);
8.1 controller包放控制層代碼,TestController類的代碼如下:
package cn.stephen.study.demoproject.controller; import cn.stephen.study.demoproject.entity.TestEntity;import cn.stephen.study.demoproject.service.TestService;import org.springframework.beans.factory.annotation.Autowired;import org.springframework.web.bind.annotation.PathVariable;import org.springframework.web.bind.annotation.RequestMapping;import org.springframework.web.bind.annotation.RequestMethod;import org.springframework.web.bind.annotation.RestController; @RestController@RequestMapping('/demoproject/test')public class TestController { @Autowired private TestService testService ; @RequestMapping(value = '/get/{id}',method = RequestMethod.GET) public TestEntity test(@PathVariable Integer id){ System.out.println('id:' + id); return testService.getById(id); } }
8.2 service層放業(yè)務(wù)處理層代碼,TestService類的代碼如下:
package cn.stephen.study.demoproject.service; import cn.stephen.study.demoproject.dao.TestDao;import cn.stephen.study.demoproject.entity.TestEntity;import org.springframework.beans.factory.annotation.Autowired;import org.springframework.stereotype.Service; @Servicepublic class TestService { @Autowired private TestDao testDao ; public TestEntity getById(Integer id){ return testDao.getById(id); }}
8.3 dao包放數(shù)據(jù)存取層代碼,TestDao代碼如下:
package cn.stephen.study.demoproject.dao; import cn.stephen.study.demoproject.entity.TestEntity;import org.apache.ibatis.annotations.Mapper; @Mapperpublic interface TestDao { TestEntity getById(Integer id); }
8.4 entity包放數(shù)據(jù)庫表對應(yīng)的實體類,TestEntity實體類代碼如下:
package cn.stephen.study.demoproject.entity; public class TestEntity { protected Integer id ; protected String magicId ; protected String firstName ; protected String lastName ; public Integer getId() { return id; } public void setId(Integer id) { this.id = id; } public String getMagicId() { return magicId; } public void setMagicId(String magicId) { this.magicId = magicId; } public String getFirstName() { return firstName; } public void setFirstName(String firstName) { this.firstName = firstName; } public String getLastName() { return lastName; } public void setLastName(String lastName) { this.lastName = lastName; }}
對應(yīng)的數(shù)據(jù)庫表的sql語句如下:
CREATE TABLE `test` ( `id` int(11) unsigned NOT NULL AUTO_INCREMENT, `magic_id` varchar(32) NOT NULL, `first_name` varchar(32) NOT NULL, `last_name` varchar(32) NOT NULL, PRIMARY KEY (`id`)) ENGINE=InnoDB AUTO_INCREMENT=11 DEFAULT CHARSET=utf8;
8.5 mapper目錄放dao層代碼的具體實現(xiàn)(這是mybatis的特色,用xml文件來實現(xiàn)數(shù)據(jù)存取),TestDaoMapper的內(nèi)容如下:
<?xml version='1.0' encoding='UTF-8' ?><!DOCTYPE mapper PUBLIC '-//mybatis.org//DTD Mapper 3.0//EN' 'http://mybatis.org/dtd/mybatis-3-mapper.dtd' ><mapper namespace='cn.stephen.study.demoproject.dao.TestDao'> <!-- 根據(jù)主鍵查詢--> <select resultType='cn.stephen.study.demoproject.entity.TestEntity' parameterType='java.lang.Integer' > select * from test where id = #{id} </select></mapper>
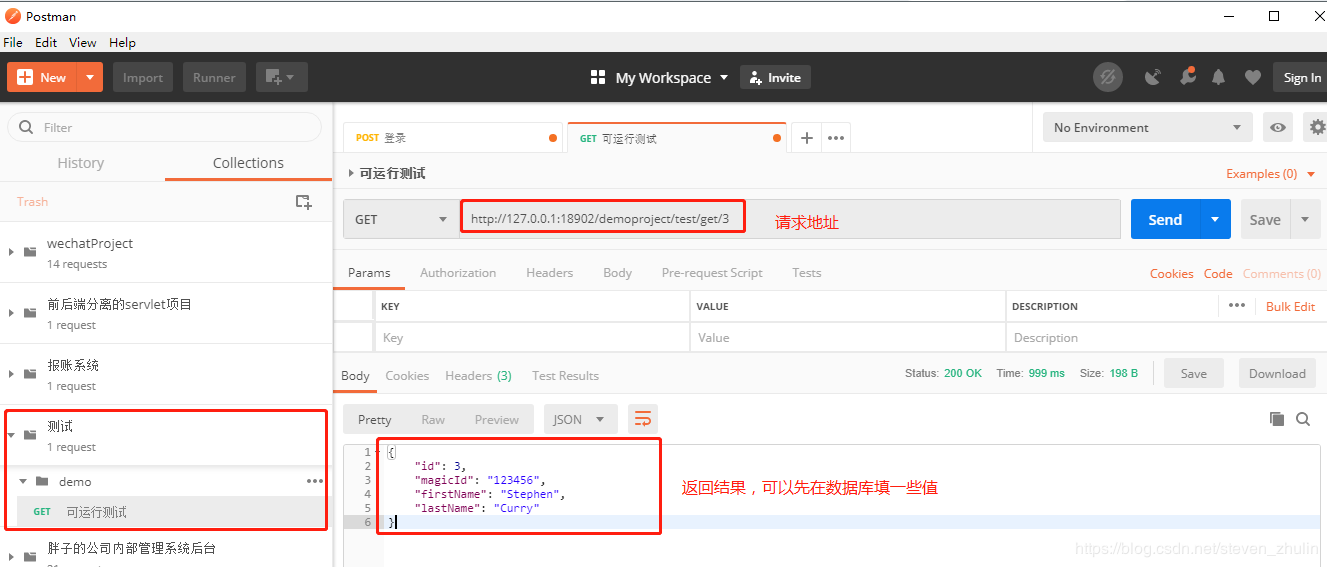
測試代碼寫完,就可以打開postman去做測試了。
(注:搜索 postman下載 即可在官網(wǎng)上下載postman軟件)
測試結(jié)果如圖:
9.結(jié)束語:
至此,搭建springboot + mybatis 的Java后臺項目已經(jīng)結(jié)束。。
附上該項目示例的github地址:https://github.com/StephenChen1/demoproject.git
到此這篇關(guān)于IDEA創(chuàng)建springboot + mybatis項目全過程的文章就介紹到這了,更多相關(guān)idea 創(chuàng)建springboot mybatis過程內(nèi)容請搜索好吧啦網(wǎng)以前的文章或繼續(xù)瀏覽下面的相關(guān)文章希望大家以后多多支持好吧啦網(wǎng)!
相關(guān)文章:

 網(wǎng)公網(wǎng)安備