springboot配置https安全連接的方法
1.項目上線,以前沒有配置過https的安全連接。。。剛剛申請了一個https免費證書。(我使用的是unbantu16系統)
Let’s Encrypt 是屬于介紹性質的,而真正用到的工具是 Certbot,去 https://certbot.eff.org/ 下載合適自己系統的Certbot。
2. 下載Certbot
sudo apt-get install software-properties-commonsudo add-apt-repository ppa:certbot/certbotsudo apt-get updatesudo apt-get install certbot
3.配置 nginx
location ^~ /.well-known/ { alias /var/www/html; default_type 'text/plain'; allow all; }
4.https://certbot.eff.org/lets-encrypt/ubuntuxenial-nginx(原網連接)。
5.cd /etc/nginx/sites-available/default進行配置:(如下)
server { # 訪問http 跳轉到https listen 80; server_name example.com; rewrite ^(.*) https://$server_name$1 permanent;} server { listen 443 ssl; server_name example.com; index index.php index.html index.htm; #####SSL##### location ^~ /.well-known/ { alias /var/www/html; default_type 'text/plain'; allow all; } ssl_certificate /etc/letsencrypt/live/example.com/fullchain.pem; ssl_certificate_key /etc/letsencrypt/live/example.com/privkey.pem; ssl_session_timeout 1d; ssl_session_cache shared:SSL:50m; ssl_session_tickets on; ssl_protocols TLSv1 TLSv1.1 TLSv1.2; ssl_prefer_server_ciphers on; # 推薦使用的ssl_ciphers值: https://wiki.mozilla.org/Security/Server_Side_TLS; ssl_ciphers’ECDHE-RSA-AES128-GCM-SHA256:ECDHE-ECDSA-AES128-GCM-SHA256:ECDHE-RSA-AES256-GCM-SHA384:ECDHE-ECDSA-AES256-GCM-SHA384:DHE-RSA-AES128-GCM-SHA256:DHE-DSS-AES128-GCM-SHA256:kEDH+AESGCM:ECDHE-RSA-AES128-SHA256:ECDHE-ECDSA-AES128-SHA256:ECDHE-RSA-AES128-SHA:ECDHE-ECDSA-AES128-SHA:ECDHE-RSA-AES256-SHA384:ECDHE-ECDSA-AES256-SHA384:ECDHE-RSA-AES256-SHA:ECDHE-ECDSA-AES256-SHA:DHE-RSA-AES128-SHA256:DHE-RSA-AES128-SHA:DHE-DSS-AES128-SHA256:DHE-RSA-AES256-SHA256:DHE-DSS-AES256-SHA:DHE-RSA-AES256-SHA:AES128-GCM-SHA256:AES256-GCM-SHA384:AES128:AES256:AES:DES-CBC3-SHA:HIGH:!aNULL:!eNULL:!EXPORT:!DES:!RC4:!MD5:!PSK’; #####SSL##### }
6.免費的會有3個月的使用期。需要3個月更新一次。
# 更新證書certbot renew --dry-run # 如果不需要返回的信息,可以用靜默方式:certbot renew --quiet
7.下面需要生成java要集成的jks證書。
1).openssl pkcs12 -export -in fullchain.pem -inkey privkey.pem -out fullchain_and_key.p12 -name tomcat
執行完第一步需要輸入倆個密碼記住項目里需要用到。
2).keytool -importkeystore -deststorepass ’密碼’ -destkeypass ’密碼’ -destkeystore MyDSKeyStore.jks -srckeystore fullchain_and_key.p12 -srcstoretype PKCS12 -srcstorepass ’密碼’ -alias tomcat
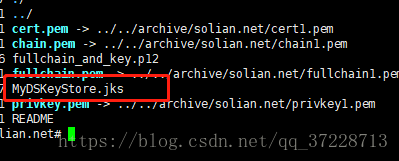
8.最終生成項目中需要用到的jks證書。。。
9.springboot項目集成:
1).項目結構

application.yml中 放的是下面的配置:
server: port: 9233 ssl: key-store: classpath:MyDSKeyStore.jks key-store-password: 密碼 key-password: 密碼
上述的所有密碼是可以設置成一樣的。當然也可以不一樣(不一樣的話得記住那個密碼是那個)。我這里為了省事,設置成一樣的了。。
2)、在啟動類里面需要加入這倆個方法。
@Bean public EmbeddedServletContainerFactory servletContainer(){ TomcatEmbeddedServletContainerFactory tomcat=new TomcatEmbeddedServletContainerFactory(){ @Override protected void postProcessContext(Context context) {SecurityConstraint securityConstraint=new SecurityConstraint();securityConstraint.setUserConstraint('CONFIDENTIAL');//confidentialSecurityCollection collection=new SecurityCollection();collection.addPattern('/*');securityConstraint.addCollection(collection);context.addConstraint(securityConstraint); } }; tomcat.addAdditionalTomcatConnectors(httpConnector()); return tomcat; } @Bean public Connector httpConnector(){ Connector connector=new Connector('org.apache.coyote.http11.Http11NioProtocol'); connector.setScheme('http'); connector.setPort(8080); connector.setSecure(false); connector.setRedirectPort(9233); return connector; }
10.成功

到此這篇關于springboot配置https安全連接的方法的文章就介紹到這了,更多相關springboot https安全連接內容請搜索好吧啦網以前的文章或繼續瀏覽下面的相關文章希望大家以后多多支持好吧啦網!
相關文章:

 網公網安備
網公網安備